
Managing blood sugar levels is crucial for individuals with diabetes or other health conditions. Are you struggling to find an efficient and accurate way to measure your blood sugar at home? Look no further than the Dr Morepen Sugar Testing Machine.
Living with diabetes often requires regular monitoring of blood glucose levels. Many individuals rely on sugar testing machines to measure their blood sugar at home. The Dr Morepen Sugar Testing Machine is a popular choice due to its user-friendly features and reliable results.
If you are new to using the Dr Morepen Sugar Testing Machine or are considering purchasing one, it is essential to understand how to utilize it effectively to ensure accurate readings. By following a few simple steps and tips, you can confidently manage your blood sugar levels and take control of your health. In this article, we will guide you through the process of using the Dr Morepen Sugar Testing Machine, enabling you to monitor your blood sugar conveniently and efficiently.
Dr. Morepen Sugar Testing Machine
The Dr. Morepen sugar testing machine is a medical device designed for measuring blood glucose levels conveniently at home. It typically consists of a glucometer, lancets, and test strips. The glucometer is a portable electronic device that provides accurate and quick results, allowing individuals with diabetes to monitor their blood sugar levels regularly.
Dr. Morepen, a reputed healthcare company, has developed these sugar testing machines to provide a reliable and user-friendly solution for people managing diabetes. These devices often come with features such as a digital display, memory storage, and adjustable settings to cater to individual needs.
Importance of Monitoring Blood Sugar Levels
Monitoring blood sugar levels is crucial for individuals with diabetes to maintain their health and well-being. Here are some key reasons highlighting the importance of regular blood sugar monitoring:

- Disease Management:
- Monitoring blood sugar levels helps individuals with diabetes manage their condition effectively by providing insights into how their bodies respond to various factors such as food, exercise, and medication.
- Treatment Adjustment:
- Regular monitoring allows for timely adjustments in medication, diet, and lifestyle, ensuring that blood sugar levels remain within the target range. This helps prevent complications associated with high or low blood sugar.
- Prevention of Complications:
- Consistent monitoring can assist in preventing long-term complications of diabetes, such as cardiovascular diseases, kidney problems, and nerve damage. By keeping blood sugar levels in check, the risk of these complications is significantly reduced.
- Immediate Action:
- Instantaneous feedback from blood sugar tests enables individuals to take immediate action in case of abnormal readings. This could involve administering insulin, adjusting medication, or making dietary changes to bring blood sugar levels back to a safe range.
- Empowerment and Awareness:
- Regular monitoring empowers individuals with diabetes by providing a deeper understanding of their body’s responses to various factors. This increased awareness encourages a proactive approach to managing diabetes.
The Dr. Morepen sugar testing machine plays a crucial role in empowering individuals with diabetes to take control of their health through convenient and accurate blood sugar monitoring. By understanding the importance of regularly tracking blood sugar levels, individuals can make informed decisions to effectively manage their condition and lead a healthier life.
How to Test Blood Glucose (Sugar) Levels at Home
Unboxing and Setting Up
Step-by-step guide on unboxing the Dr. Morepen sugar testing machine
- Check the Package:
- Inspect the external packaging for any signs of damage during transit. Ensure that the package is sealed and that all components are included.
- Open the Box:
- Carefully open the box, taking note of any instructional materials or user manuals at the top. These documents typically contain important information on device usage and maintenance.
- Inspect the Contents:
- Check the contents of the box against the list provided in the user manual. Common components include the glucometer, lancet device, test strips, control solution (if applicable), and a user manual.
- Remove Protective Packaging:
- Carefully remove any protective covers or packaging from the individual components to reveal the glucometer and accessories.
- Check the Glucometer:
- Examine the glucometer for any visible damage. Ensure that the battery compartment is accessible and that the device appears to be in good condition.
- Verify Accessories:
- Check the lancet device, test strips, and any other accessories. Ensure that there are a sufficient number of lancets and test strips for initial use.
- Read User Manual:
- Take the time to read the user manual thoroughly. This will provide specific instructions on device usage, maintenance, and troubleshooting.
Instructions for setting up the device
- Install Batteries:
- If the glucometer requires batteries, install them according to the instructions in the user manual. Ensure that the batteries are fresh to avoid any power-related issues.
- Turn On the Glucometer:
- Power on the glucometer using the designated button or switch. Wait for the device to initialize and display any welcome messages or prompts.
- Set Date and Time (if applicable):
- If the glucometer has date and time settings, configure them as per the instructions in the user manual. This is crucial for accurate record-keeping.
- Prepare Lancet Device:
- If the package includes a lancet device, load it with a lancet according to the provided instructions. Adjust the depth setting based on individual comfort and skin type.
- Insert Test Strip:
- Insert a test strip into the glucometer following the guidelines in the user manual. The device may prompt you to apply a drop of blood once the test strip is inserted.
- Perform Control Tests (if recommended):
- Some glucometers may recommend performing control tests using a control solution. Follow the instructions in the user manual to ensure the device’s accuracy.
- Familiarize Yourself with Functions:
- Explore the functions of the glucometer, including navigating menus, recording results, and accessing memory features. Understanding these functions will make daily usage more convenient.
By following these steps, users can successfully unbox and set up the Dr. Morepen sugar testing machine, ensuring that the device is ready for accurate blood glucose monitoring. Always refer to the user manual for specific instructions and guidelines tailored to the particular model of the glucometer.
Features
Key features of the sugar testing machine
The Dr. Morepen sugar testing machine typically comes equipped with several key features designed to enhance user experience and provide accurate blood glucose monitoring. Here’s an overview of these features:

- Digital Display:
- The digital display presents blood glucose readings in a clear and easily readable format.
- Memory Storage:
- This feature allows the device to store previous blood glucose readings, enabling users to track trends over time and share the data with healthcare providers.
- Adjustable Settings:
- The glucometer may offer customizable settings for factors such as date and time, measurement units, and sound settings, providing a personalized experience.
- Compact and Portable Design:
- The device is designed to be compact and portable, facilitating convenient use at home or on the go.
- Lancet Device:
- The included lancet device is used for obtaining a small blood sample for testing. It often comes with adjustable depth settings for individual comfort.
- Test Strips:
- Test strips are used in conjunction with the glucometer to measure blood glucose levels accurately. They are inserted into the device for each test.
- Quick Results:
- The sugar testing machine typically provides rapid results, allowing users to obtain blood glucose readings within a short timeframe.
Explanation of each feature and its significance
- Digital Display:
- Significance: The digital display presents blood glucose readings in a format that is easy to read and interpret, providing users with immediate feedback on their current blood sugar levels.
- Memory Storage:
- Significance: Memory storage allows users to track trends and patterns in their blood glucose levels over time. This information is valuable for individuals and healthcare professionals in making informed decisions regarding treatment and lifestyle adjustments.
- Adjustable Settings:
- Significance: Customizable settings enhance user experience by allowing individuals to set preferences such as date and time formats, measurement units (mg/dL or mmol/L), and sound preferences. This personalization contributes to user comfort and ease of use.
- Compact and Portable Design:
- Significance: The compact and portable design of the sugar testing machine promotes convenience, enabling users to monitor their blood glucose levels at home or while on the move. This feature encourages regular testing and promotes overall adherence to diabetes management.
- Lancet Device:
- Significance: The lancet device is crucial for obtaining a blood sample for testing. Adjustable depth settings accommodate different skin types and sensitivities, ensuring a comfortable and efficient blood sampling process.
- Test Strips:
- Significance: Test strips are essential components for accurate blood glucose measurement. They contain the necessary chemicals to react with the blood sample and provide a reliable reading on the glucometer.
- Quick Results:
- Significance: Rapid results are particularly important for individuals managing diabetes as they allow for immediate decisions and actions based on current blood glucose levels. This feature facilitates timely adjustments in medication, diet, or lifestyle.
Understanding and utilizing these features effectively contribute to the overall functionality and user-friendliness of the Dr. Morepen sugar testing machine, ultimately supporting individuals in their diabetes management journey.
Always refer to the user manual for specific details and guidelines related to the features of the particular model of the glucometer.
Preparing for Testing
Guidance on proper hand hygiene before testing

Proper hand hygiene is crucial before conducting blood glucose testing to ensure accurate results and minimize the risk of infection. Follow these steps for effective hand hygiene:
- Wash Your Hands:
- Begin by washing your hands thoroughly with soap and warm water. Rub your hands together for at least 20 seconds, ensuring that you clean all surfaces, including the back of your hands, between your fingers, and under your nails.
- Use Hand Sanitizer (if needed):
- If soap and water are not readily available, you can use an alcohol-based hand sanitizer containing at least 60% alcohol. Apply a sufficient amount to cover all surfaces of your hands and rub them together until dry.
- Avoid Moisturizers or Creams (if advised):
- Some hand creams or moisturizers may contain substances that could interfere with blood glucose readings. If advised by your healthcare provider or the product instructions, avoid applying these substances to your hands before testing.
- Ensure Dryness:
- After washing or sanitizing your hands, ensure that they are completely dry before handling the sugar testing machine, lancet device, or test strips. Any residual moisture could affect the accuracy of the blood glucose reading.
- Inspect Your Hands:
- Before proceeding with testing, visually inspect your hands for any signs of cuts, bruises, or other abnormalities. Choosing a testing site without these issues can help minimize discomfort during the blood sampling process.
Tips for selecting the right testing site
Selecting the right testing site is essential for obtaining an accurate blood sample and ensuring a comfortable testing experience. Consider the following tips:
- Fingertips:
- The fingertips are a common and recommended site for blood glucose testing. Use the sides of the fingertips rather than the center to minimize discomfort. Rotate among different fingertips to avoid excessive soreness.
- Alternate Sites (if applicable):
- Some glucometers allow testing on alternate sites such as the palm, forearm, or thigh. However, it’s important to check the user manual and consult with a healthcare professional before using these alternate sites.
- Avoid Calloused Areas:
- Avoid testing on areas with calloused or scarred skin, as these can impact the accuracy of readings and cause discomfort during testing.
- Warm the Testing Site (if needed):
- If your hands are cold, consider warming them up by rubbing or shaking them gently. Warmer hands can enhance blood flow and make the blood sampling process more comfortable.
- Clean the Testing Site:
- Clean the chosen testing site with mild soap and water, especially if there are visible contaminants. Pat the area dry with a clean, dry cloth before proceeding with testing.
- Rotate Testing Sites:
- To minimize the risk of developing callouses or discomfort, rotate your testing sites regularly. This helps distribute the impact of the lancet and promotes overall skin health.
By following these guidelines, individuals can ensure proper hand hygiene before testing and select an appropriate testing site for accurate and comfortable blood glucose monitoring with the Dr. Morepen sugar testing machine. Always refer to the device’s user manual for specific recommendations and guidelines related to testing preparation.
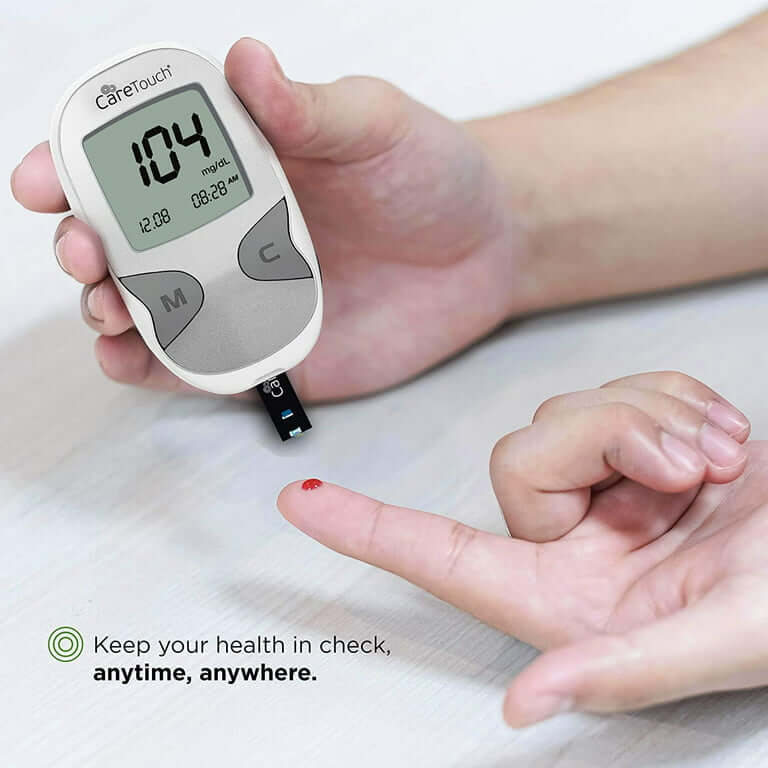
Conducting a Blood Sugar Test
Step-by-step instructions for using the Dr. Morepen sugar testing machine

- Prepare the Glucometer:
- Ensure that the glucometer is turned on and ready for use. Check the battery level if applicable.
- Insert a Test Strip:
- Take a test strip from the packaging and insert it into the designated slot on the glucometer, following the specific instructions in the user manual.
- Prepare the Lancet Device:
- Load the lancet device with a lancet according to the user manual’s instructions. Adjust the depth setting based on individual comfort and skin type.
- Select the Testing Site:
- Choose an appropriate testing site, such as the sides of the fingertips. Ensure the selected site is clean, dry, and free from visible contaminants.
- Clean the Testing Site (if needed):
- Clean the testing site with mild soap and water if there are any visible contaminants. Pat the area dry with a clean, dry cloth.
- Prick the Testing Site:
- Use the loaded lancet device to prick the selected testing site. Follow the user manual’s guidelines for obtaining a small blood sample.
- Apply Blood to Test Strip:
- Once a small drop of blood appears, carefully touch it to the end of the test strip. Ensure that the blood is absorbed by the strip for an accurate reading.
- Wait for Results:
- The glucometer will display the blood glucose reading on the digital screen. Wait for the results to appear and take note of the value.
- Record the Result:
- If desired, record the blood glucose reading in a logbook or on the device if it has memory storage. This information can be useful for tracking trends over time.
- Dispose of Lancet and Test Strip:
- Safely dispose of the used lancet and test strip according to local regulations and guidelines.
- Turn Off the Glucometer (if applicable):
- Turn off the glucometer to conserve battery life if it doesn’t automatically power down.
Common troubleshooting tips for Dr. Morepen sugar testing machine
- Error Messages:
- If the glucometer displays an error message, consult the user manual for guidance on troubleshooting specific issues. Common errors may include issues with the test strip, insufficient blood sample, or device malfunctions.
- Inconsistent Readings:
- If you notice inconsistent readings, ensure that the test strips are within their expiration date and stored properly. Check for any visible damage to the strips or the glucometer.
- Device Not Powering On:
- If the device doesn’t power on, check the battery compartment for proper battery installation and replace batteries if necessary.
- Lancet Device Issues:
- If the lancet device fails to prick or causes discomfort, ensure that it is loaded correctly, and the depth setting is appropriate. If problems persist, consult the user manual or contact customer support.
- Calibration (if applicable):
- Some glucometers may require occasional calibration. Refer to the user manual for instructions on how to calibrate the device if necessary.
- Consult Customer Support:
- If you encounter persistent issues or are unsure about any aspect of the testing process, contact the customer support provided by Dr. Morepen for assistance.
By following these step-by-step instructions and addressing common troubleshooting issues, users can confidently conduct blood sugar tests with the Dr. Morepen sugar testing machine. Always refer to the user manual for model-specific guidelines and recommendations.
Interpreting the Results
Understanding the numerical values on the device
The numerical values displayed on the Dr. Morepen sugar testing machine represent the blood glucose concentration in either milligrams per deciliter (mg/dL) or millimoles per liter (mmol/L), depending on the unit settings. Here’s a general guide to understanding these values:
- Normal Range:
- Typically, blood glucose levels in a fasting state (before meals) are considered normal if they fall within the range of 70 to 100 mg/dL (3.9 to 5.6 mmol/L). However, reference ranges may vary, and it’s essential to follow the guidelines provided by healthcare professionals.
- Elevated Levels:
- Elevated blood glucose levels may indicate a state of hyperglycemia. Levels above the normal fasting range but below 126 mg/dL (7.0 mmol/L) may suggest impaired fasting glucose (prediabetes). Higher values may indicate diabetes.
- Low Levels:
- Blood glucose levels below 70 mg/dL (3.9 mmol/L) may indicate hypoglycemia. Low blood sugar can lead to symptoms such as shakiness, dizziness, and confusion.
- Postprandial Levels:
- Blood glucose levels after meals (postprandial) can vary. In general, levels below 140 mg/dL (7.8 mmol/L) two hours after eating are considered normal. However, individual targets may vary based on specific circumstances and medical advice.
It’s crucial to note that target ranges and interpretation can vary based on individual health conditions, age, and other factors. Always consult with a healthcare professional for personalized guidance.
Reference to recommended blood sugar levels
For individuals managing diabetes, healthcare professionals typically provide personalized target ranges based on factors such as age, overall health, and the presence of other medical conditions. However, here are general recommendations provided by major health organizations:
- Fasting Blood Glucose:
- The American Diabetes Association (ADA) suggests a target fasting blood glucose level of 80 to 130 mg/dL (4.4 to 7.2 mmol/L) for most adults with diabetes.
- Postprandial Blood Glucose:
- The ADA recommends a target postprandial blood glucose level below 180 mg/dL (10.0 mmol/L) two hours after starting a meal.
- A1C Levels:
- The ADA recommends an A1C level of less than 7% for many adults with diabetes. The A1C test reflects average blood glucose levels over the past 2-3 months.
It’s important to emphasize that these are general guidelines, and individual targets may vary. Healthcare providers work with patients to establish personalized blood glucose targets based on specific health conditions and lifestyle factors.
Regular communication with a healthcare professional is essential for interpreting results accurately and making informed decisions about diabetes management. Monitoring trends over time and adjusting treatment plans in consultation with a healthcare team helps individuals achieve and maintain optimal blood glucose control.
Maintenance and Care for Dr. Morepen sugar testing machine
Tips for cleaning and maintaining the sugar testing machine
Proper maintenance and care of the Dr. Morepen sugar testing machine are essential for accurate and reliable performance. Follow these tips to keep the device in optimal condition:
- Clean the Glucometer:
- Use a soft, dry cloth to clean the exterior of the glucometer. Avoid using harsh chemicals, solvents, or excessive moisture, as they may damage the device.
- Cleaning the Display Screen:
- Gently wipe the display screen with a soft, dry cloth to remove any smudges or fingerprints. If needed, use a mild screen cleaner suitable for electronic devices.
- Lancet Device Maintenance:
- Regularly clean the lancet device according to the manufacturer’s instructions. Ensure that the device is free from blood residues and contaminants. Some devices may have removable parts that can be cleaned separately.
- Dispose of Lancets and Test Strips Properly:
- Safely dispose of used lancets and test strips in accordance with local regulations. Use a puncture-resistant container for lancets and follow guidelines for the disposal of biohazardous materials.
- Avoid Exposure to Extreme Temperatures:
- Keep the sugar testing machine away from extreme temperatures. Avoid exposing it to direct sunlight, excessive heat, or cold, as these conditions can affect its performance.
- Battery Replacement:
- If the device operates on batteries, monitor the battery level regularly. Replace the batteries according to the user manual’s recommendations to ensure uninterrupted functionality.
- Check Expiry Dates of Test Strips:
- Ensure that the test strips are within their expiration date. Using expired strips may result in inaccurate readings. Store test strips in a cool, dry place, away from direct sunlight and moisture.
- Regular Calibration (if applicable):
- Some glucometers may require periodic calibration. Refer to the user manual for instructions on how to calibrate the device if necessary.
Storage recommendations
- Store in a Cool, Dry Place:
- When not in use, store the sugar testing machine in a cool, dry place. Avoid leaving it in areas prone to high humidity or extreme temperature fluctuations.
- Protect from Direct Sunlight:
- Prevent exposure to direct sunlight, as prolonged exposure can damage the device and affect its accuracy.
- Secure Lancet Devices and Test Strips:
- Store lancet devices and test strips in a clean and dry environment, following the manufacturer’s recommendations. Keep them in their original packaging until ready for use.
- Avoid Physical Damage:
- Store the glucometer in a protective case or pouch to prevent physical damage during transportation or storage.
- Keep Away from Water:
- Protect the device from water or any liquids. Do not submerge the glucometer or any of its components in water.
By following these maintenance and storage tips, users can ensure the longevity and accuracy of the Dr. Morepen sugar testing machine. Regular cleaning and proper care contribute to reliable performance, providing individuals with confidence in their blood glucose monitoring results. Always refer to the user manual for model-specific maintenance guidelines and recommendations.
Tips for Better Blood Sugar Management
Lifestyle and diet recommendations
- Maintain a Balanced Diet:
- Follow a well-balanced diet that includes a variety of whole foods, such as fruits, vegetables, lean proteins, and whole grains. Limit the intake of refined sugars and processed foods.
- Control Portion Sizes:
- Be mindful of portion sizes to help regulate carbohydrate intake. This can contribute to more stable blood sugar levels after meals.
- Choose Complex Carbohydrates:
- Opt for complex carbohydrates with a low glycemic index, such as whole grains, legumes, and vegetables. These foods are digested more slowly, leading to gradual increases in blood sugar.
- Monitor Sugar Intake:
- Read food labels to identify hidden sugars in packaged foods. Minimize the consumption of sugary beverages and desserts.
- Incorporate Regular Physical Activity:
- Engage in regular exercise to help control blood sugar levels and improve insulin sensitivity. Aim for a combination of aerobic exercises (like walking or jogging) and strength training.
- Stay Hydrated:
- Drink plenty of water throughout the day. Staying hydrated supports overall health and can help regulate blood sugar levels.
- Manage Stress:
- Practice stress-reducing activities such as deep breathing, meditation, or yoga. Chronic stress can impact blood sugar levels, so finding effective stress management techniques is crucial.
- Get Adequate Sleep:
- Ensure you get enough quality sleep each night. Lack of sleep can affect insulin sensitivity and lead to imbalances in blood sugar levels.
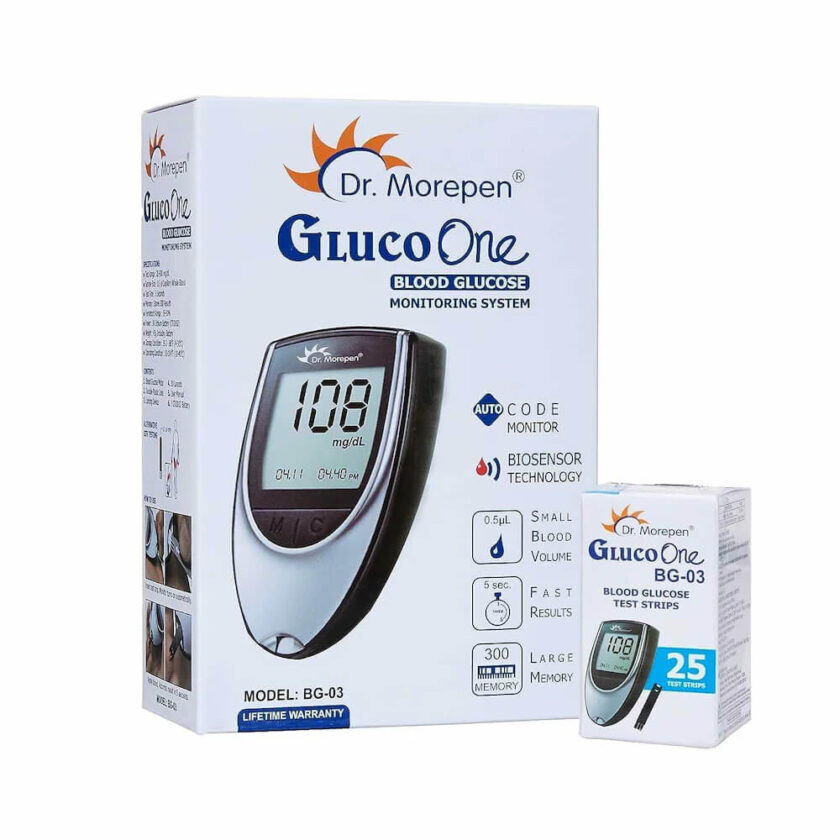
How to Use Dr Morepen Gluco One BG Glucometer Monitor
Integrating regular testing into a diabetes management routine
- Establish a Testing Schedule:
- Create a consistent schedule for blood sugar testing. This helps in tracking patterns and making timely adjustments to medications, diet, or lifestyle.
- Record Results and Patterns:
- Keep a logbook or use the memory function of your sugar testing machine to record blood sugar readings. This information is valuable for healthcare professionals in making informed decisions.
- Set Testing Reminders:
- Use alarms or reminders on your phone to prompt regular testing, especially if you have specific times for meals or medication.
- Integrate Testing into Daily Routines:
- Make blood sugar testing a routine part of your daily activities. This can help normalize the process and make it feel less intrusive.
- Celebrate Successes:
- Acknowledge and celebrate achievements in blood sugar management. Whether it’s maintaining consistent readings or making positive lifestyle changes, recognizing successes can be motivating.
- Seek Support:
- Share your blood sugar management goals with friends, family, or a support group. Having a support system can provide encouragement and accountability.
- Regularly Review with Healthcare Professionals:
- Schedule regular check-ups with your healthcare team to review blood sugar trends, discuss challenges, and make necessary adjustments to your diabetes management plan.
- Educate Yourself:
- Stay informed about diabetes management through reputable sources. Understanding the condition empowers you to make informed decisions about your health.
By incorporating these lifestyle and testing recommendations into your daily routine, you can work towards better blood sugar management. Remember, individual needs may vary, so consult with your healthcare team for personalized advice and adjustments to your diabetes management plan.
Conclusion
In conclusion, effective blood sugar management is crucial for individuals with diabetes to maintain optimal health and well-being. The Dr. Morepen sugar testing machine serves as a valuable tool in this journey, providing a convenient and reliable means of monitoring blood glucose levels at home.
This guide has covered essential aspects of using the Dr. Morepen sugar testing machine, from unboxing and setting up the device to conducting tests, interpreting results, and maintaining the equipment. Understanding the features of the device, proper hand hygiene, selecting appropriate testing sites, and adhering to recommended storage and maintenance practices are fundamental for accurate and consistent blood glucose monitoring.
Lifestyle and diet recommendations, as well as integrating regular blood sugar testing into a comprehensive diabetes management routine, play a pivotal role in achieving and maintaining stable blood glucose levels. By adopting a balanced diet, engaging in regular physical activity, managing stress, and establishing a routine for testing and recording results, individuals can empower themselves to make informed decisions about their health.
Remember that diabetes management is a dynamic process, and individual needs may vary. Regular communication with healthcare professionals, adherence to prescribed medications, and a proactive approach to lifestyle adjustments contribute to successful blood sugar control.
As technology and healthcare continue to evolve, staying informed about advancements in diabetes management and regularly consulting with healthcare providers remain essential. The Dr. Morepen sugar testing machine, coupled with a holistic approach to diabetes care, can significantly contribute to a healthier and more fulfilling life for individuals managing diabetes.
Always refer to the user manual for specific instructions related to your Dr. Morepen sugar testing machine model, and consult with your healthcare team for personalized advice and support on your diabetes management journey.